将remix项目迁移到cloudflare
最近使用remix开发了一个项目,之前没有做过全栈开发,reactjs用过一些,不是很熟,用的是Nextjs, 感觉太难用, 主要是13版本换了app router后,有点摸不着头脑了.
后来发现remix这个, 直接用文件名路由,要方便许多, loader, action 的方式也非常直观, 于是就选用了remix
项目开发得差不多了,就想怎么部署,之前准备Vercel, 有一天看到 https://blog.meathill.com/infra/vercel-vs-cloudflare-pages-how-to-choose-to-deploy-your-website.html, 还是觉得cloudflare猛啊(适合白嫖)
于是准备迁移到cloudflare
步骤
remix是支持直接创建cloudflare部署的项目的,但是我已经是开发中的项目了,就不能用模板创建了.
复制文件
先用remix创建一个cloudflare模板项目: pnpm create cloudflare@latest my-remix-app -- --framework=remix
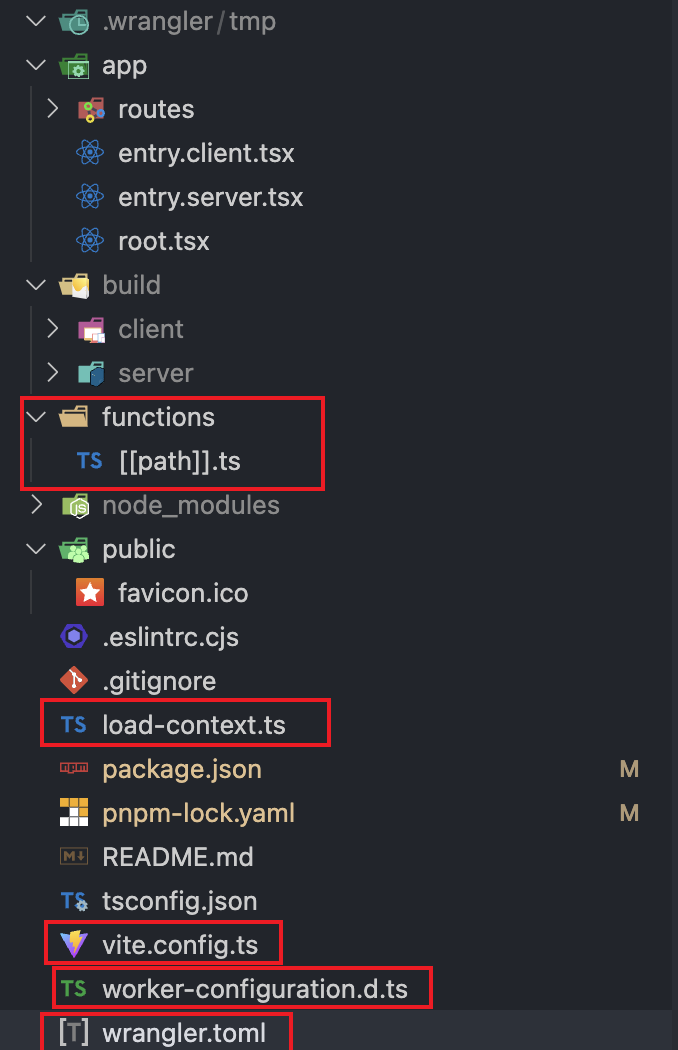
创建完成后, 和我自己的项目比较一下:
 多出了这些文件,拷贝过去
安装库
1
2
|
pnpm add -d vite @cloudflare/workers-types autoprefixer postcss vite-tsconfig-paths wrangler
pnpm add @remix-run/cloudflare @remix-run/cloudflare-pages
|
文件修改
在tsconfig.json中添加:
1
2
3
4
5
6
7
|
"compilerOptions": {
    "lib": ["DOM", "DOM.Iterable", "ES2022"],
    "types": [
      "@remix-run/cloudflare",
      "vite/client",
      "@cloudflare/workers-types/2023-07-01"
  ],
|
wrangler.toml
按需配置wrangler.toml, 用到那些就配置那些, 我用到了d1_database, r2_buckets 等
postcss.config.cjs[js]
1
2
3
4
5
6
|
module.exports = {
    plugins: {
      tailwindcss: {},
      autoprefixer: {},
    },
  };
|
tailwind.css
1
2
3
4
5
|
@tailwind base;
@tailwind components;
@tailwind utilities;

export default {}
|
entry.server.tsx
 1
 2
 3
 4
 5
 6
 7
 8
 9
10
11
12
13
14
15
16
17
18
19
20
21
22
23
24
25
26
27
28
29
30
31
32
33
34
35
36
37
|
import type { AppLoadContext, EntryContext } from "@remix-run/cloudflare";
import { RemixServer } from "@remix-run/react";
import { isbot } from "isbot";
import { renderToReadableStream } from "react-dom/server";

export default async function handleRequest(
  request: Request,
  responseStatusCode: number,
  responseHeaders: Headers,
  remixContext: EntryContext,
  // This is ignored so we can keep it in the template for visibility.  Feel
  // free to delete this parameter in your app if you're not using it!
  // eslint-disable-next-line @typescript-eslint/no-unused-vars
  loadContext: AppLoadContext
) {
  const body = await renderToReadableStream(
    <RemixServer context={remixContext} url={request.url} />,
    {
      signal: request.signal,
      onError(error: unknown) {
        // Log streaming rendering errors from inside the shell
        console.error(error);
        responseStatusCode = 500;
      },
    }
  );

  if (isbot(request.headers.get("user-agent") || "")) {
    await body.allReady;
  }

  responseHeaders.set("Content-Type", "text/html");
  return new Response(body, {
    headers: responseHeaders,
    status: responseStatusCode,
  });
}
|
root.tsx
 1
 2
 3
 4
 5
 6
 7
 8
 9
10
11
12
13
14
15
16
17
18
19
20
21
22
23
24
25
26
27
28
29
30
31
32
33
34
35
36
37
38
39
40
41
|
import { cssBundleHref } from '@remix-run/css-bundle';
import type { LinksFunction } from '@remix-run/node';
import {
  Links,
  LiveReload,
  Meta,
  Outlet,
  Scripts,
  ScrollRestoration,
} from '@remix-run/react';

import styles from './tailwind.css?url';
import { ThemeProvider } from './context/themeContext';

// export const links: LinksFunction = () => [{ rel: 'stylesheet', href: './tailwind.css' }];
export const links = () => {
  return [
    { rel: "stylesheet", href: styles }
  ];
}

export default function App() {
  return (
    <ThemeProvider>
      <html lang="en">
        <head>
          <meta charSet="utf-8" />
          <meta name="viewport" content="width=device-width, initial-scale=1" />
          <Meta />
          <Links />
        </head>
        <body>
            <Outlet />
            <ScrollRestoration />
            <Scripts />
            <LiveReload />
        </body>
      </html>
    </ThemeProvider>
  );
}
|
注意这个: import styles from './tailwind.css?url';, 多了个?url
package.json
 1
 2
 3
 4
 5
 6
 7
 8
 9
10
11
|
"scripts": {
    "build": "remix vite:build",
    "deploy": "pnpm run build && wrangler pages deploy ./build/client",
    "dev": "remix vite:dev",
    "lint": "eslint --ignore-path .gitignore --cache --cache-location ./node_modules/.cache/eslint .",
    "start": "wrangler pages dev ./build/client",
    "typecheck": "tsc",
    "typegen": "wrangler types",
    "preview": "pnpm run build && wrangler pages dev ./build/client",
    "build-cf-types": "wrangler types"
  },
|
Node compatibility
根据官方 ,
, nodejs的一些核心库是不能直接在worker pages中运行的, 有两种方法, 第一种: Use runtime APIs directly, 我没有使用成功, 我使用的是第二种, Add polyfills using Wrangler, 在wrangler.toml中增加: node_compat = true, 注意两种不能兼容.
prisma 迁移
数据库之前是PostgresSQL,现在要迁移到D1 Database, 常见Prisma文档: https://www.prisma.io/docs/orm/prisma-client/deployment/edge/deploy-to-cloudflare
假设数据库名称为 my-d1, 先要生成sql
pnpm npx wrangler d1 migrations create my-d1 --local
会在本地生成migration目录, 在执行:
1
2
3
4
5
|
pnpm npx prisma migrate diff \
  --from-empty \
  --to-schema-datamodel ./prisma/schema.prisma \
  --script \
  >> migrations/0001_init_.sql
|
第一次生成迁移文件, 会存放到migrations/0001_init_.sql中去.
执行迁移文件: pnpm npx wrangler d1 migrations apply my-d1 --local
到这一步,迁移就完成了,但是,不出意外的出意外了:
1
|
near "CONSTRAINT": syntax error at offset 41 [code: 7500]
|
这玩意也没有说是哪一行代码, 提示的41根本就不是, 只能一行行删除后实验, 最后发现是: ALTER TABLE "tablename" ADD CONSTRAINT
的错误, 差了一下:https://developers.cloudflare.com/d1/reference/migrations/#foreign-key-constraints
bindings 使用
在cloudflare pages中使用bindings, 比如: KV, R2时,老是读取不到这些binding, 仔细研究测试多次,发现一些流程:
functions/[[path]].ts
1
2
3
4
5
|
export const onRequest = createPagesFunctionHandler({
	build,
	mode: process.env.NODE_ENV,
	getLoadContext: context => ({ env: context.context.cloudflare.env }),
});
|
getLoadContext要设置env: context.context.cloudflare.env
wrangler.toml
在文件中需要配置对应binding的信息, 并且, 在cloudflare pages 的dashboard里,也要配置对应环境(production, preview)的binding, 名称要一样
typegen
修改wrangler.toml或者dashboard中的bindings后, 需要运行: pnpm run types, 也就是: wrangler types, 会生成worker-configuration.d.ts 文件, wrangler.toml中对应的设置就会更新:
1
2
3
4
|
interface Env {
	SOME_KV: KVNamespace;
	SOME_R2: R2Bucket;
}
|
在remix服务端使用:
1
|
context.env.SOME_KV.put(key, 'some value');
|

 多出了这些文件,拷贝过去
,